
Some Users have asked me about a Bluetooth Toggle for Zooper Widget. After the notification counter, the Tasker Variables and the Task Trigger this will be my fourth tutorial. Here is how it works. You will need Tasker and Zooper.
Zooper Bluetooth Toggle
If you are familiar with the Trigger Tasker Tasks from Zooper tutorial, this should be easy for you!
Tasker Setup
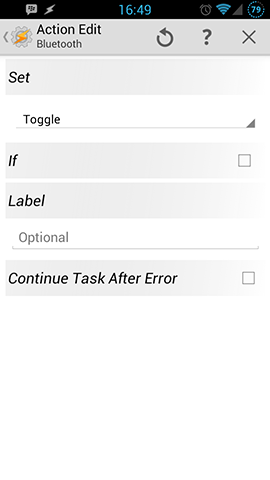
Create a new Task. I called it "Bluetooth" and press "+" to add an Action. Then choose "Net" and "Bluetooth". Change Set to "Toggle" as in the picture beneath. Confirm with the back button.
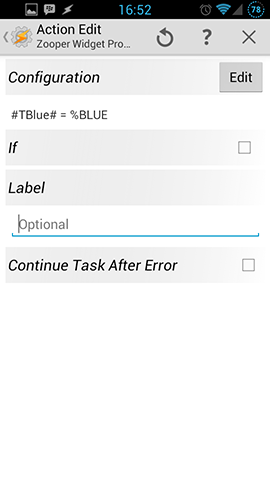
Add a second Action, go to "Plugin", "Zooper Widget" and press "Edit". Now name your "ZW Variable", I chose "BLUE" (in Zooper it will be automatically #TBLUE#) and as "ZW Text" you should put in "%BLUE" as this is the automatically monitored Bluetooth State.
Your finished Tasker Task should look like this. As you can see, I chose an Icon for this Task according to my Trigger Tasker Tasks from Zooper tutorial, because otherwise it would ask for it later. That's all what you have to do in Tasker for your Zooper Bluetooth Toggle.

Zooper Setup
Now you have to make a Theme that uses this Zooper Bluetooth Toggle.
I made a Test 2x2 Theme and defined the Tasker Bluetooth Task as "Widget OnTap-Action" for the whole Theme. For sure, you want to do that as an "Modul OnTap" Action in your later Themes. Trigger Tasker Tasks from Zooper helps you, if you don't know how to do that.
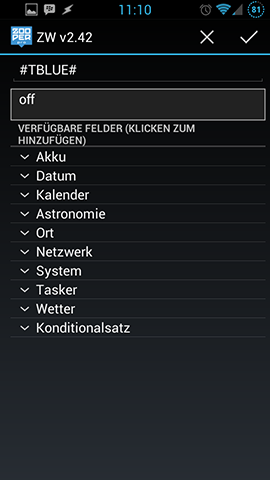
Then I've added a Text item, chose “Edit text manually” and put in my Zooper Variable name (#TBLUE#).
Your Zooper Bluetooth Toggle is finished. If you have copied my Test Theme, your screen should look like this. As Tasker monitores the %BLUE Variable with "off" or "on", Zooper shows the same.


"on" or "off" is surely not the thing that you want to see on your Zooper Bluetooth Toggle Theme. There are several ways of changing that:
- Change the Tasker Task by adding an extra Variable instead of "%BLUE" that is transfered to Zooper. This is the most tedious way and i won't explain it extra.
- Use Conditionals. Edit “Edit text manually” to your needs.
You could do "$#TBLUE#=on?Blue:Black$" to show "Blue" when it's on and "Black" if it's off (just an example).
"$#TBLUE#=on?Blue$" will just show "Blue" when it's on, nothing if it's off.
- Transfering the Variable in Bitmaps in Zooper (show one picture if off, show other if on). Here is how to do that.
For general Zooper Widget posts check here.
You can find more Zooper Widget Tutorials here.
Pingback: Icons für Variable Werte in Zooper anzeigen lassen | jagwar
Pingback: [APK] Zooper Widget (Free/Pro/Skins) | Beschreibung, Tips, Tricks, Fragen zur Technik - Seite 249 - Android-Hilfe.de
I can’t get $#TBLUE#=on?Blue:Black$ to work for some reason.
I have a good grasp of how these parameters work, I am trying to apply this to a bitmap.
so I got $#TBLU#=on?[whatever the parameter for opacity is]:[opposite parameter]$
So I want one bitmap to be 100% transparent when its on, and the other to be visible.
But for some reason it simply doesn’t work. I feel like a fool for it too haha. If I remove ‘on’ it presents a parameter in the box below.. I can’t tell what I am doing wrong 🙁
You have to use this: https://www.jagwar.de/show-icons-for-variable-states-in-zooper/
$#TBLUE#=on?Blue:Black$ is just for text.
I’ve been reading your tutorials for quite sometime now and it helps me a lot. A big thanks for that. I have 1 question though. In programming, a programmer can add variable named “switch” that toggles ON and OFF when something happens. I would like to know how can I employ a variable that toggles ON and OFF whenever I tap an icon. It doesn’t matter what app to launch or toggle ON/OFF. For example, I tap on an icon, tasker will send an ON or OFF, depending on its previous state (If previous state is ON, it will send OFF and vice versa), signal to zooper for that variable. And I can use that variable on any task or tasks. Is it possible? If so, how? Thank you so much for your time.